
Broncolor Siros 800 S WiFi / RFS 2 Betjeningsvejledning
Følgende betjeningsvejledning til Broncolor Siros 800 S er en gengivelse af de officielle materialer fra producenten til hurtig reference for PhotoRobot kunder. Disse materialer har til formål at understøtte den indledende forståelse og uafhængige drift af deres Broncolor Siros 800 S-enhed. Vær dog opmærksom på, at Broncolor-lys administreres direkte i PhotoRobot _Controls app. Dette sikrer, at der ikke er behov for at installere drivere til Broncolor hardwarestyring på kundesiden.
For teknisk information om hardwarekomponenter, softwareværktøjer, hovedtilstande og anbefalede indstillinger for Broncolor-lys med PhotoRobot, se PhotoRobot – Broncolor Lights Management.
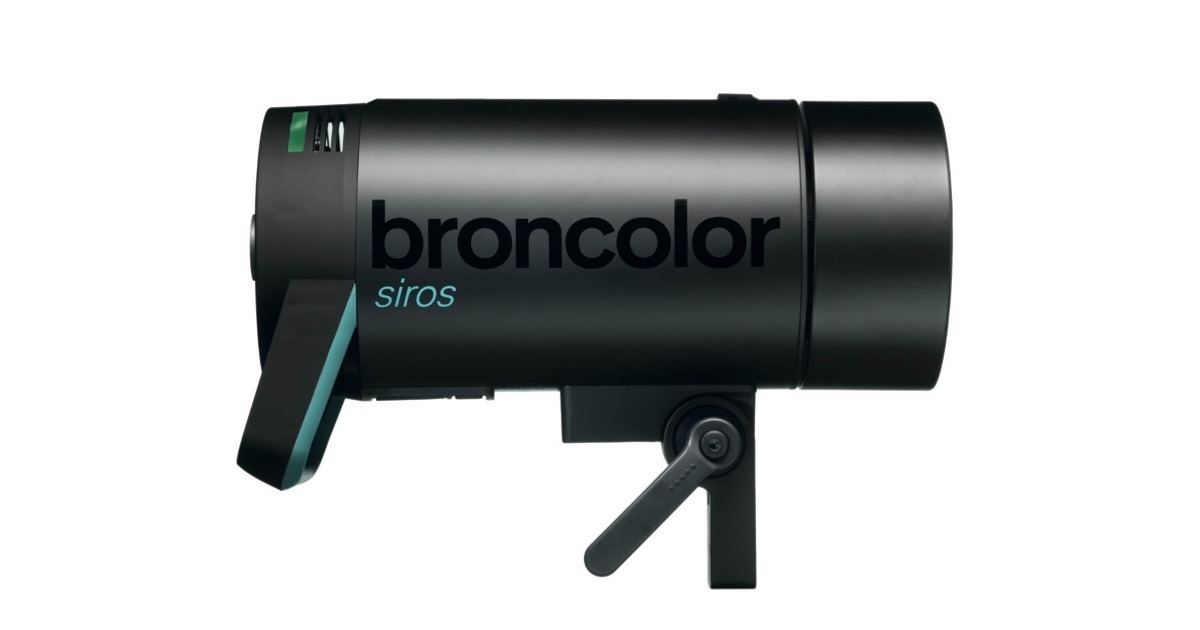
Bemærk: Disse betjeningsinstruktioner er en gengivelse af de officielle instruktioner fra producenten for Broncolor Siros 8 S-seriens studielamper. Se producentens hjemmeside broncolor.swiss for den originale dokumentation om dit specifikke produkt. Samtidig skal du sørge for at følge alle instruktioner, der specifikt følger med din enhed, før den bruges første gang.
Kontroller og skærme
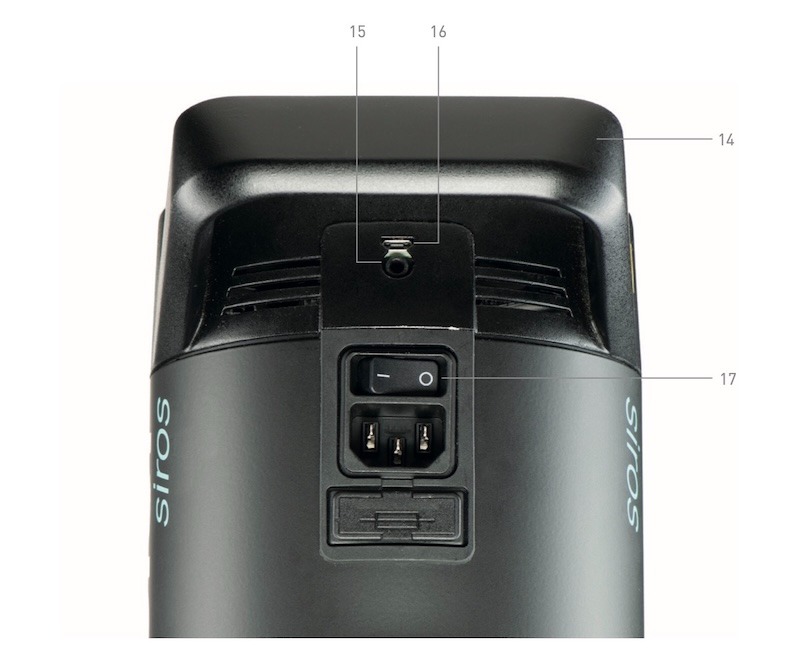
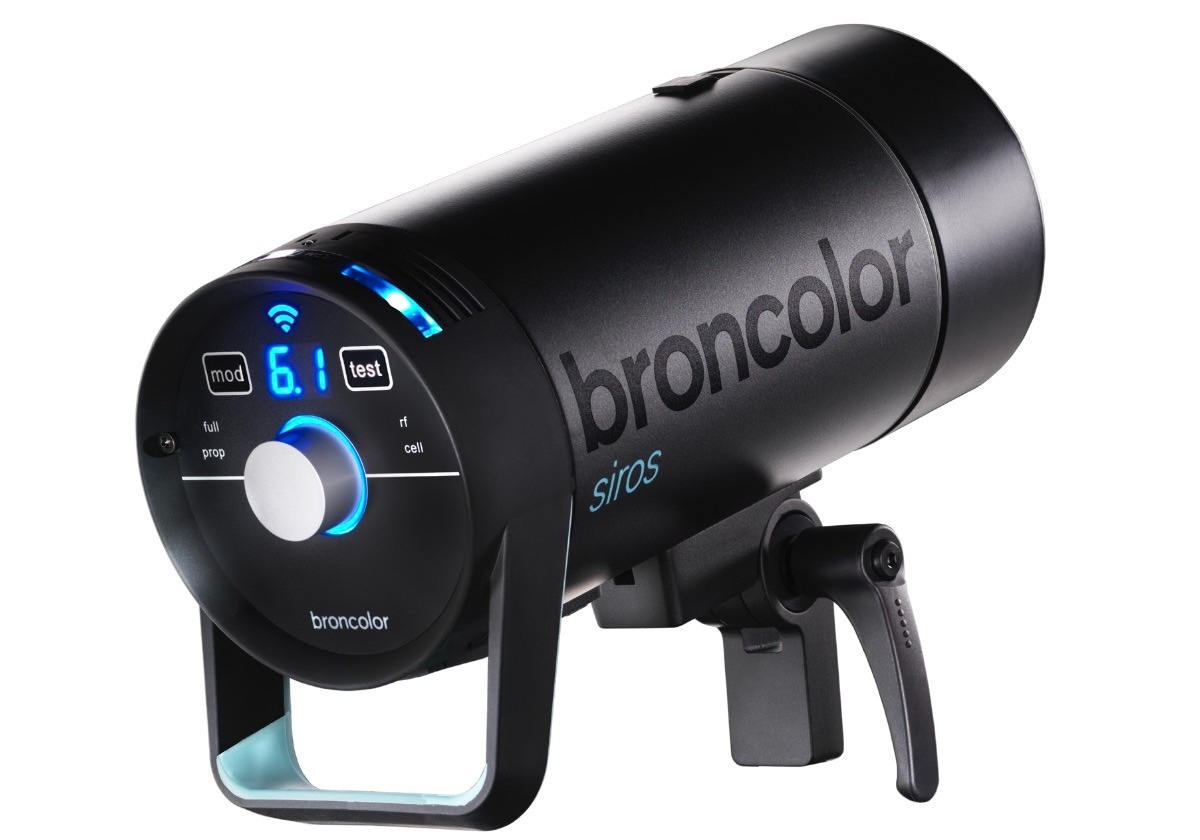
Betjeningen og displayet på Broncolor Siros 800 S er som følger.
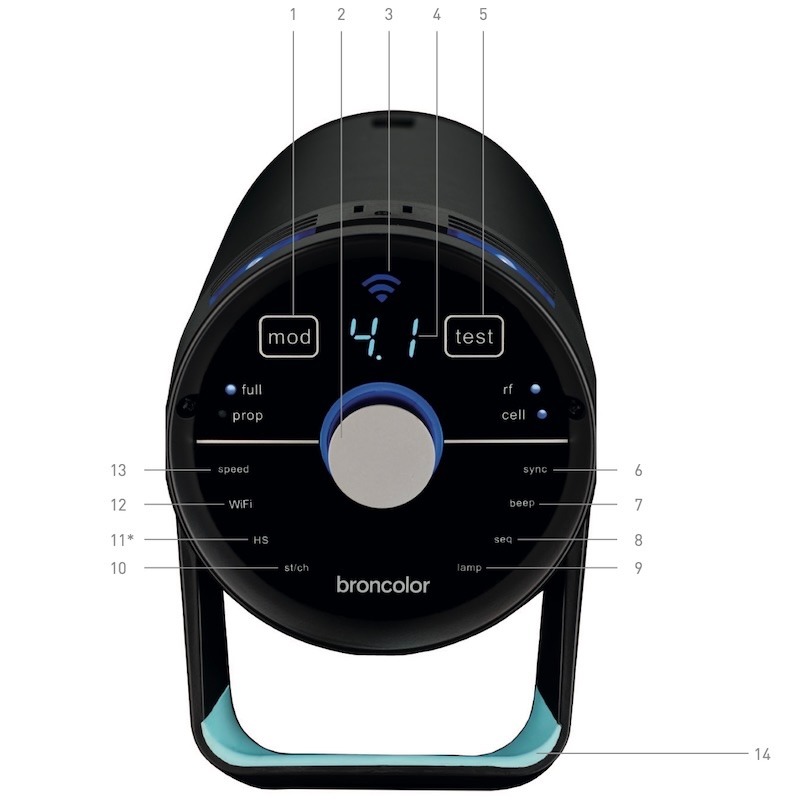
- Modellys tændt/slukket
- Roterende controller
- WiFi-skærm
- Digital strømfordelingsskærm
- "Test"-nøgle
- Menuindstillinger
- Menuindstillinger
- Menuindstillinger
- Menuindstillinger
- Menuindstillinger
- Menuindstillinger
- Menuindstillinger
- Menuindstillinger
- Håndtag
- Sync-sokkel
- Mini USB
- Hovedkontakt
Før brug
Broncolor Siros S er et produkt af høj kvalitet, der giver mange års service, hvis det bruges korrekt. Sørg for nøje at læse alle oplysninger i disse betjeningsinstruktioner, som også indeholder vigtige instruktioner til brug og vedligeholdelse af apparatet. Henvis yderligere brugere til disse instruktioner for at gøre nye brugere fortrolige med enheden, dens brug og vedligeholdelse. Overhold desuden altid sikkerhedsinstruktionerne, der er givet separat til din enhed fra Broncolor.
Indholdsfortegnelse
- Forsyningsområde
- Første opstart
- Kontrolelementer
- Oversigt over hovedmenuens funktioner
- Menunavigation
- Kontrol af flashtider
- Udgivelse
- HS-funktion
- Særlige funktioner
- Information og fejlmeddelelser
- Ofte stillede spørgsmål
- Tilbehør
- Vedligeholdelse / Reparationer
- Miljøbeskyttelsesinformation
- Garanti og meddelelse for britiske kunder
- Tekniske data
1. Forsyningsområde
1.1. Siros 800 S WiFi / RFS 2 – 31.643.XX
Først skal du sikre dig, at du har modtaget følgende varer i leveringen.
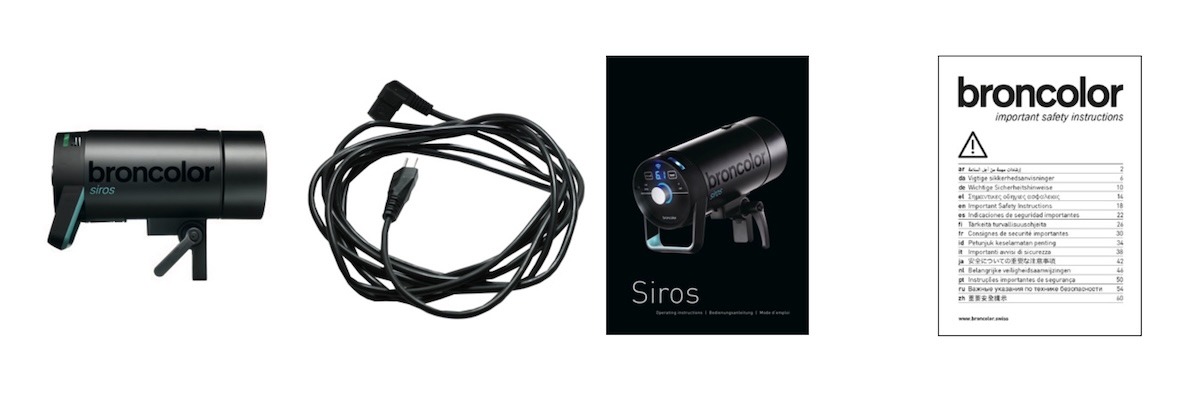
- Siros S monolight
- Strømkabel
- Betjeningsinstruktioner (BA109.00)
- Vigtige sikkerhedsinstruktioner (WA-18-1)
1.2. Byggesæt
Indholdet af Siros Expert Kit omfatter:
- 2× Siros 800 S WiFi / RFS 2
- 1× Paraply, 85 cm (33,574,00)
- 1× Softbox 60 x 60 (33.561.00)
- 1× Speed Ring (33.401.00)
- 2× Junior Stand AC (35.100.00)
- 1× Flash Bag 2 (36.532.00)
- 1× Tilbehørstaske (36.535.00)
- 1× Synkroniseringskabel (34.111.00)
Indholdet i Siros Pro Kit inkluderer:
- 3× Siros 800 S WiFi / RFS 2
- 1× Softbox 60 x 60 (33.561.00)
- 1× Octabox 75 (33.600.00)
- 2× Speed Ring (33.401.00)
- 2× L40 Standardreflektor (33.115.00)
- 3× Junior Stand AC (35.100.00)
- 1× Flash Bag 3 (36.533.00)
- 1× Tilbehørstaske (36.535.00)
- 1× Synkroniseringskabel (34.111.00)
2. Første opstart
2.1. Fjern beskyttelsesdæksel
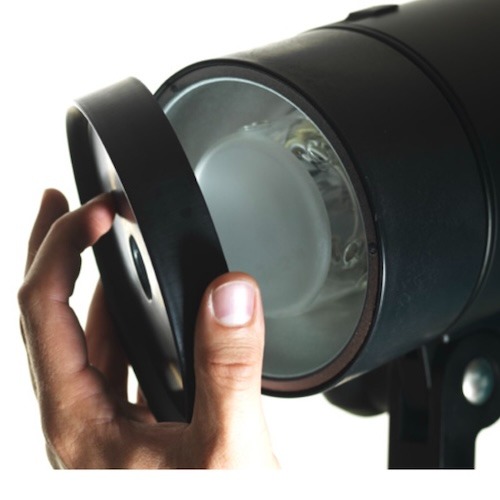
2.2. Stik netkablet i
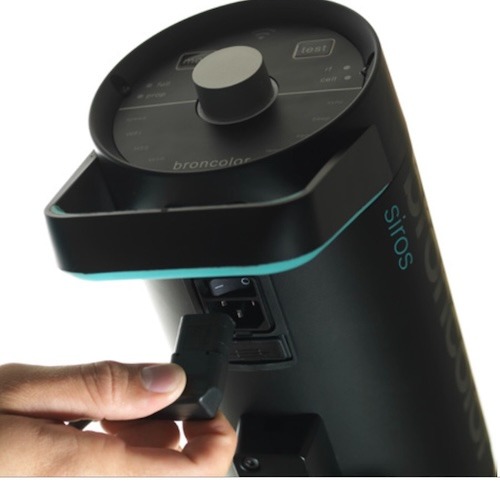
2.3. Tænd enheden ved hovedkontakten
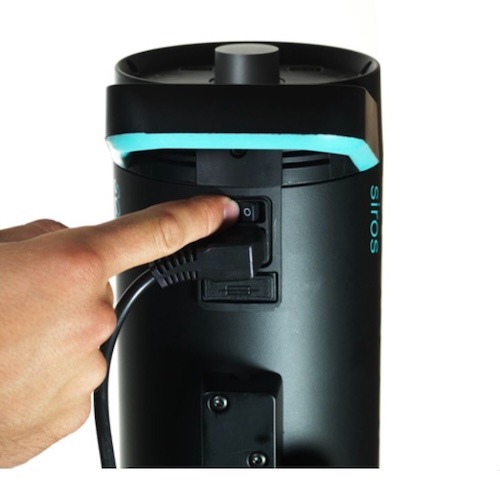
3. Kontrolelementer
3.1. Elementfunktioner
Roterende controller (2)

- Den roterende controller (2) fungerer til at tænde og slukke for enheden (standby-tilstand). Trykker du drejecontrolleren i 3 sekunder, skifter enheden til standby.
- I menuen aktiverer drejeknappen menunavigation og bekræftelse af menupunkter. Der gives yderligere forklaring af menunavigation i kapitel 5.
- I drift ændrer den roterende controller flashenergien. At dreje mod uret reducerer flashenergien, mens rotation med uret øger den. Imens ændrer man den langsomt ved at dreje controlleren i 1/10 blændetrin, og dreje hurtigt ("dreje") i 1/1 blændestop-trin.
Info-display (4)
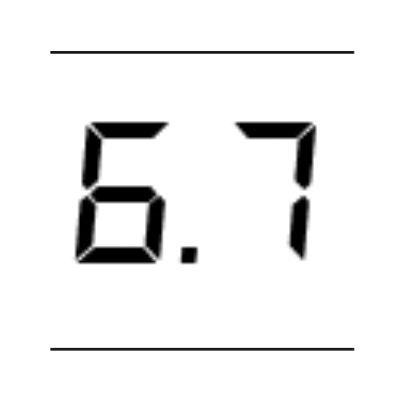
- Infodisplayet (4) viser den valgte flashenergi eller menuvalgmulighederne.
Mod - Modelleringslys TIL / FRA (1)
- Brug "mod" (1) til at tænde eller slukke modellyset. Et længere tryk på knappen ændrer driftstilstanden fra "fuld" til "prop" eller omvendt.
Test (5)
- Ved at bruge "test" (5) vil testen starte. "Klar"-displayet omkring den roterende controller skifter til blå, så snart opladnings-/afladningsoperationen er afsluttet.
3.2. Menufunktioner
Hastighed (13)
- "Hastighed" (13) menuindstillingen er til hurtigopladning og flash-tider. Find yderligere forklaring i kapitel 6 af disse betjeningsinstruktioner.
WiFi (12)
- "WiFi" (12) angiver, om WiFi'en er tændt eller slukket.
HS (11)

- "HS" angiver, om HS er tændt eller slukket.
Studie / Kanal (10)
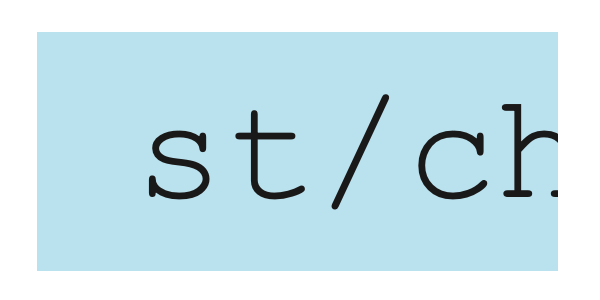
- Menuindstillingen "st / ch" (10) er til at skifte studie/kanal. Brug den til at skifte den aktuelle studiekanal (RFS 2).
Lampe (9)

- Brug menuindstillingslampen (9) til at vælge lampekanalen (RFS 2).
Sekvens (8)
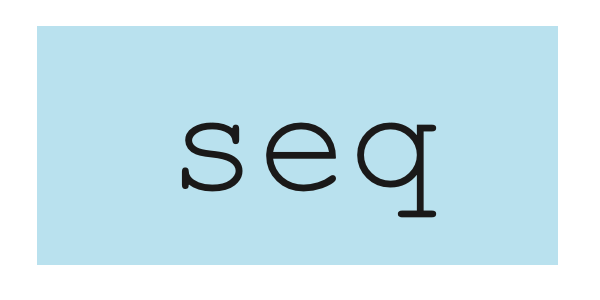
- Menuindstillingen "seq" (8) vælger antallet af flashes.
Bip (7)
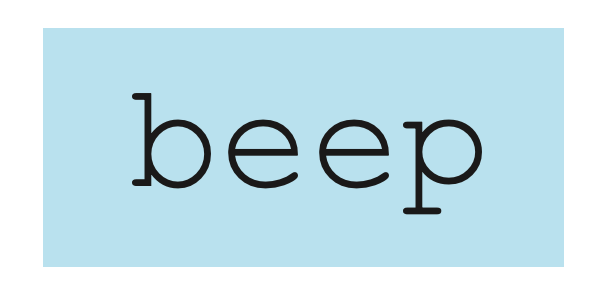
- "bip" (7) menufunktionen viser, om den akustiske "Klar"-advarsel er tændt eller slukket.
Sync (6)
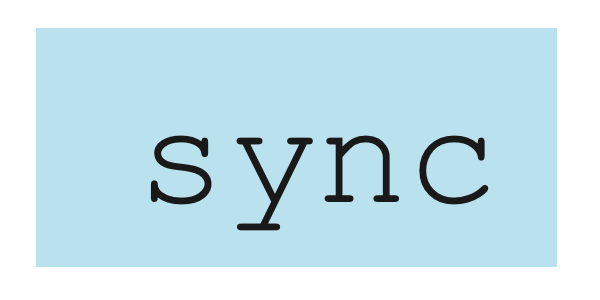
- Ved at bruge "sync" (6) kan man vælge forskellige frigivelsesmetoder (fotocelle, radio, fotocelle og/eller radio).
Sync-stik / Mini USB (15 / 16)

- Brug menufunktionerne Sync-socket / Mini USB (15 / 16) til frigivelse via sync-kablet, eller softwareopdatering via mini USB.
Tænd/Sluk (17)

- Brug tænd/sluk (17) på enheden til at tænde eller slukke den.
4. Oversigt over hovedfunktionerne
Hovedfunktionerne er som følger.
- For at komme ind i hovedmenuen, tryk på drejeknappen (2).
- Drej drejeknappen (2) med eller mod uret for at nå det ønskede menupunkt.
- For at bekræfte dit valg, tryk drejeknappen (2) igen. Det valgte menupunkt begynder at blinke.
5. Menunavigation
Menufunktionerne på Broncolor Siros 800 S inkluderer:
- Hastighed
- WiFi
- HS
- st/ch
- lampe
- seq
- Bip
- Synkronisering
Efter at have trykket på drejeknappen (2), går du ind i hovedmenuen på monolighten. Derfra har du adgang til de forskellige funktioner.
Bemærk venligst: Hvis en menupost ikke kan vælges, som for eksempel med produkter andre end Siros 800 S, understøtter enheden ikke denne funktion.
Eksempel: Sæt en sekvens på 15 flashes pr. udgivelse.
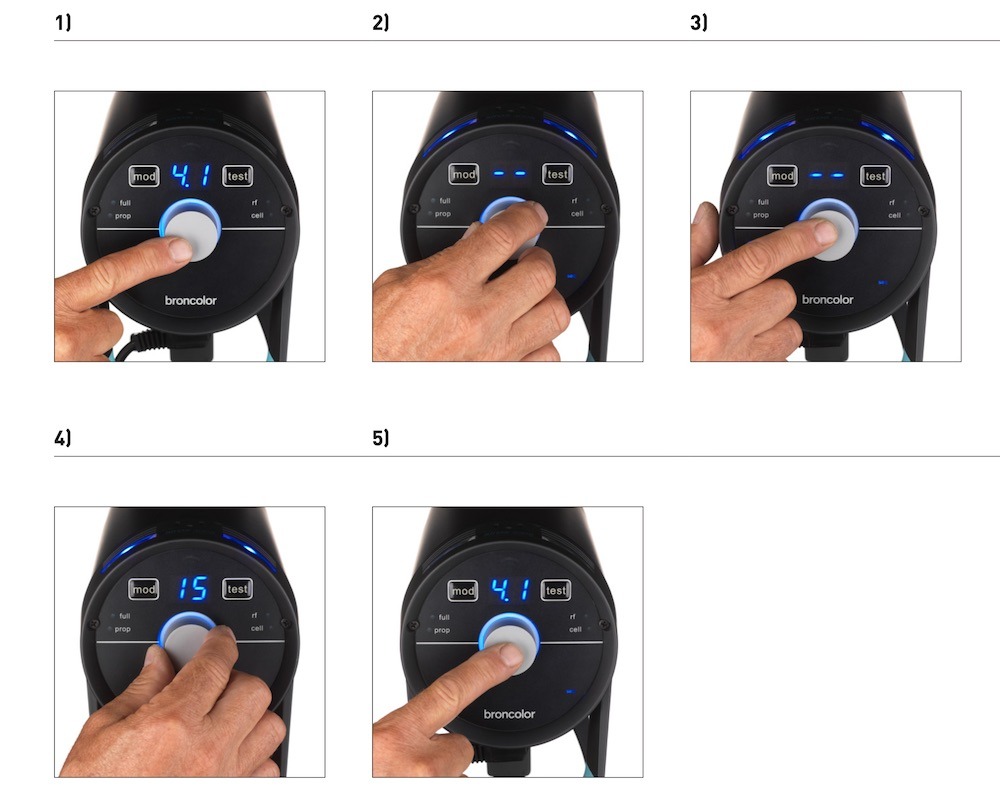
- Tryk på drejeknappen (2) for at komme ind i hovedmenuen. Det sidst valgte menupunkt vises. Hoveddisplayet skifter fra at vise udgangseffekten til det valgte menupunkt.
- Drej drejeknappen (2), indtil du når menupunktet "seq".
- Tryk på drejeknappen (2) for at bekræfte denne funktion. "seq"-displayet begynder at blinke.
- Drej drejeknappen (2), indtil "15" vises på hoveddisplayet.
- Bekræft dette valg ved at trykke på drejeknappen (2). Efter denne bekræftelse skifter enheden til sin normale tilstand. Hvis valget ikke bekræftes inden for 5 sekunder, skifter enheden til sin normale tilstand uden at ændre sin indstilling.
6. Kontrol af flashtider
I hovedmenuen kan du sætte monolysets blinktid til "hastighed". Denne indstilling beregner den hurtigst mulige blinktid for det valgte energiniveau. Dette kan også få flashfarven til at skifte en smule mod det blå område.
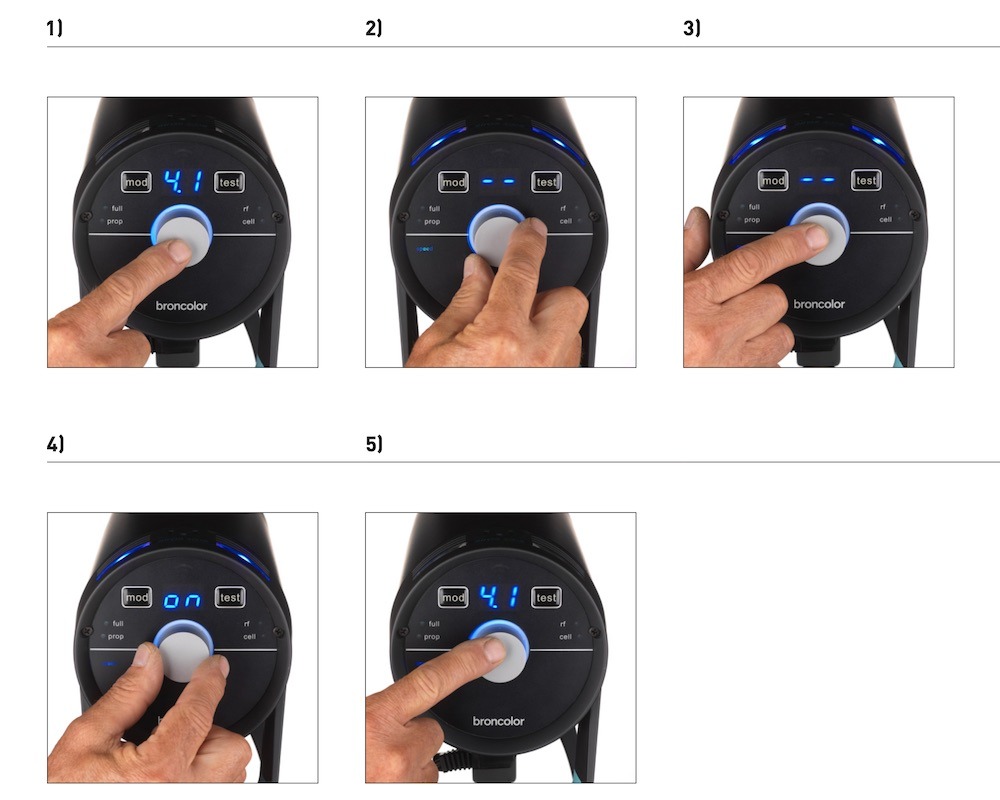
- Tryk på drejeknappen (2) for at komme ind i hovedmenuen.
- Drej drejeknappen (2), indtil du når menupunktet "hastighed".
- Bekræft dette valg ved at trykke på drejeknappen (2).
- Brug drejeknappen (2) til at vælge "tændt" eller "slukket".
- Bekræft dette med drejecontrolleren (2).
7. Udgivelse
7.1. RFS 2-modul (radiofrekvenssystem)
For RFS 2 flash-kontrol skal kanalen (studieadressen) svare til senderens kanal. Studieadressen sættes i menuen på position "st". Lampekanalen defineres i menuen under "lampe". Se afsnit 9.3 for mere information om ændring af farverne på kognitionslysene.
Med radiotransceiveren kan du definere og indstille de enkelte lamper, som du ønsker. For at lære at gøre dette, se venligst betjeningsvejledningen for transceiveren. Transceiveren er ikke standardmedfølgende med individuelle hoveder.
7.2. Fotocelle (celle)
Fotocellen kan tændes og slukkes ved hjælp af menufunktionen "sync" (6). Når denne er aktiv, tændes den blå LED ved siden af "cell"-mærkaten. Efter det første blink i en sekvens deaktiveres den aktive fotocelle, og den blå LED ved siden af "sync"-tasten (6) blinker. Ved at trykke på "test"-tasten tændes den igen.
7.3. Synkroniseringssokkel (15)
Synkroniseringskablerne – 5 m (16,4 fod) (Art. Nr. 34.111.00) og 10 m (32,8 fod) (34.112.00) – kan monteres i stikket til kabelfrigivelse (15).
7.4. "test" Nøgle (5)
Med denne tast kan monolyset aktiveres manuelt. Flashen kan udløses, så snart 70 % af det indstillede energiniveau er nået. Den visuelle "Klar"-indikator tænder derimod kun, når 100 % er nået.
8. HS-funktion
I kombination med RFS 2.2-senderen kan du bruge Siros 800 S monolys med ekstremt hurtige lukkertider. For eksempel kan billedet med omgivende lys, selv med blænden helt åben (selektiv fokus), undereksponeres korrekt med op til 1/8000s, og Siros lader dig stadig indstille dominerende og kreative lyseffekter.
Alt du behøver til dette er RFS 2.2-senderen, som fås til Canon-, Fuji-, Nikon- og Sony-kameraer. Derudover skal HS aktiveres på alle Siros-enheder. Dette ændrer blitzkurven og garanterer, i kombination med RFS 2.2, korrekt eksponering uden begrænsninger på dit valg af lukkertid.
Læs venligst betjeningsvejledningen til RFS 2.2-senderen for at lære mere om optimal udnyttelse af HS-funktionen.
Når du arbejder i HS-tilstand, kan du kun bruge flash power niveau 4 til 10 med Siros.
9. Særlige funktioner
9.1. Nulstil (til fabriksindstillinger)
Tryk på "test"-tasten (5) i 4 sekunder. Dette nulstiller alle funktioner til fabriksindstillingerne. Nulstilling bekræftes af et dobbelt bip.
9.2. "bronControl" App og WiFi-indstillinger
For at styre din Siros-monolight kan du også downloade "bronControl"-appen gratis. For at finde appen, søg efter "bronControl" i Apples App Store eller i Googles Play Store.
9.2.1. Driftstilstande
9.2.1.1. Drift i "Privat" tilstand (fabriksindstilling)
Hvis WiFi-tilstanden aktiveres på mere end én monolight, forbinder disse enheder automatisk med samme studieadresse for at danne et privat netværk. En smartphone eller tablet skal derefter tilsluttes dette netværk for at kunne styre det. For at bruge dette skal du aktivere WiFi-funktionen på din smartphone eller tablet. Din enhed vil derefter automatisk søge efter tilgængelige WiFi-netværk. Forbind din smartphone eller tablet til det relevante Bron-Studio-netværk. Adgangskoden til forbindelsen er: bronControl. Start nu "bronControl"-appen på din enhed. Indsæt det relevante studienummer under "tilføj nyt studie" og forbind appen med dette studie. For yderligere instruktioner om drift, brug venligst hjælpefunktionen "?" i appen.
9.2.1.2. Drift i "Enterprise"-tilstand
Hvis der er et eksisterende WiFi-netværk (router), kan enheden integreres i dette netværk via en smartphone eller tablet. For at opnå dette skal du i "bronControl"-appen, under indstillinger, gå til "Netværksindstillinger" og indtaste routerens indstillinger i "enterprise"-tilstand. Sørg for, at enhederne er sat til den korrekte studieadresse. Siros gemmer den sidste type forbindelse og forsøger at forbinde til det sidste netværk næste gang, den starter.
9.2.2. Menuindstillinger
Menuindstillingerne er defineret som følger: tændt / slukket / synkroniseret (tændt / -- / sy).
9.2.3. WiFi-skærm (3) på enheden
Symbolerne og deres beskrivelser for Wifi-displayet (3) på enheden er som følger.
9.3. Kognitionslys
Når de forskellige lampekanaler vælges (zoner), skifter kognitionslyset på enhedens øverste overflade farve. Formålet med dette er at skelne mellem individuelle enheder, når de styres af "bronControl"-appen. Lyset på enheden skifter farve, når appen aktiveres på en smartphone eller tablet, eller når den roterende controller på enheden trykkes; den skifter tilbage til blå, når den forlader menuen.
Lampekanalens farver er som følger.
10. Informations- og fejlmeddelelser*
10.1. Akustiske signaler
De akustiske signaler er en biplyd eller en dobbeltbip.
10.2. Besked i visning
Bemærk: *Fejlmeddelelser vises altid også med det røde kognitionslys.
11. Ofte stillede spørgsmål
11.1. Ændring af blitzrør
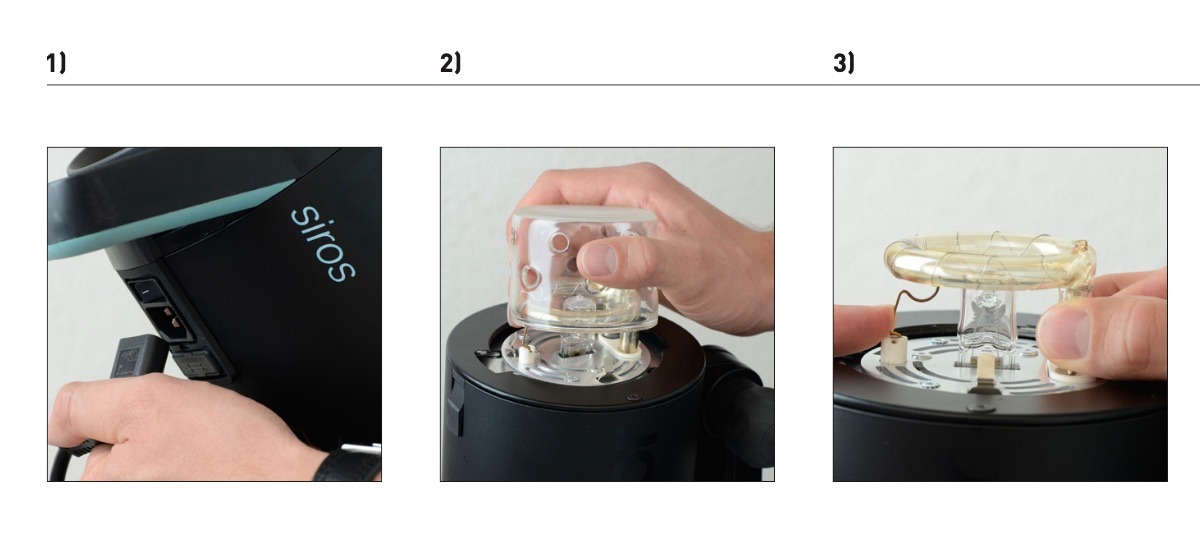
- Afbryd netkablet fra enheden.
- Fjern sikkerhedsglasset ved at trække det ud af dets låseklips.
- Tryk kontaktfjederen nedad og træk blitzrøret forsigtigt ud.
11.2. Udskiftning af sikringen
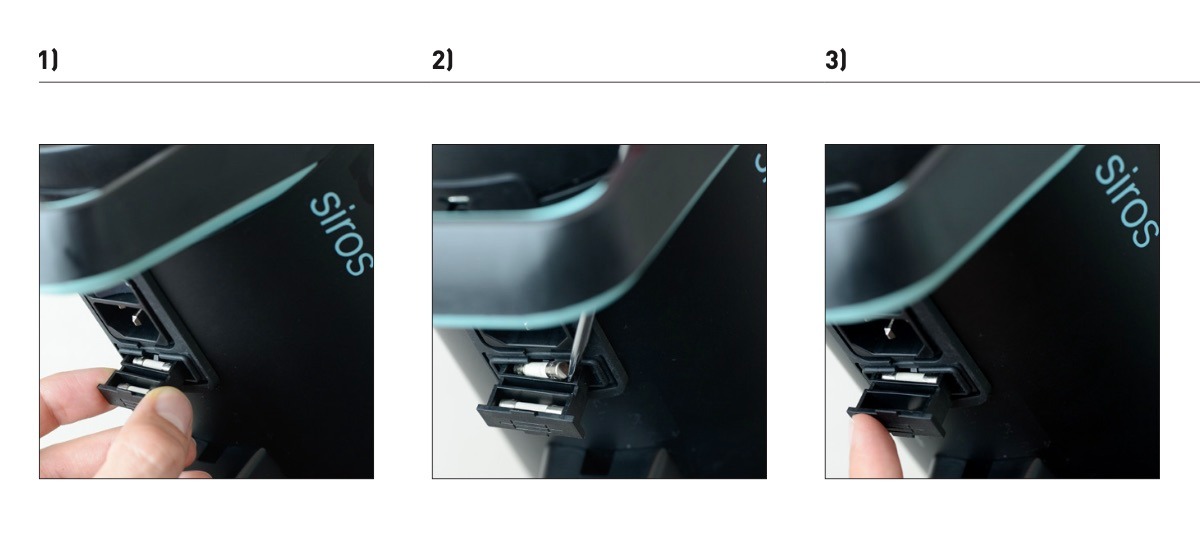
- Afbryd netkablet fra enheden (se billede 1 ovenfor). Åbn sikringsrummet under enheden.
- Løs forsigtigt den sprængte sikring ud med et spidst objekt.
- Indsæt den nye sikring og luk sikringsrummet igen
11.3. Skiftende lysformere
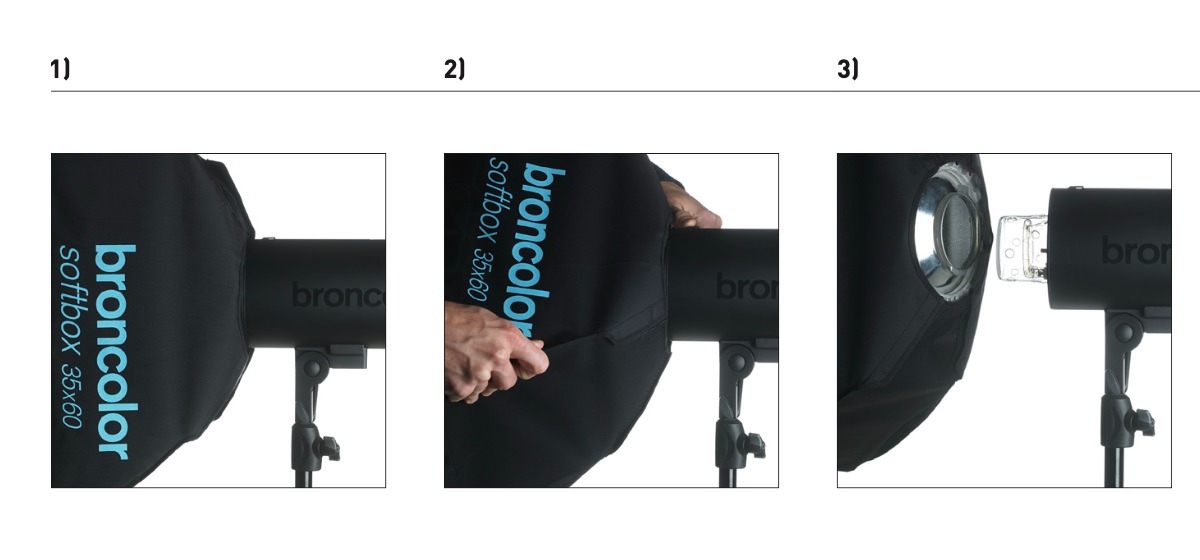
- Drej lysformeren i begge retninger til dens stop.
- Træk udløseren bagud og drej samtidig lysformen, indtil den er fri af bajonettbeslaget.
- Fjern forsigtigt lysformeren foran. Pas på ikke at beskadige sikkerhedsglasset.
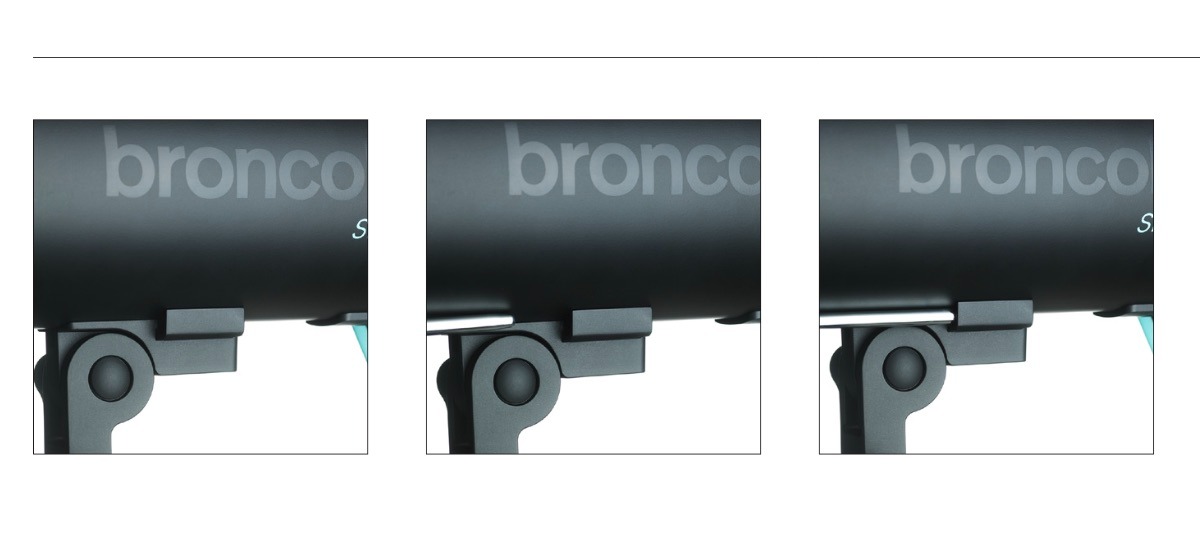
11.4. Montering af en paraply
For at montere paraplyen, monter den i åbningen under enheden.
12. Tilbehør
Siros er kompatibel med hele sortimentet af broncolor lysformere.
Følgende genstande repræsenterer særligt anbefalede tilbehør:
13. Vedligeholdelse og reparationer
Dit Broncolor monolight er et præcisionsinstrument, der kan levere mange års problemfri drift, når det behandles med passende omhu. Men hvis der opstår en fejl, bør du ikke selv forsøge at åbne enheden og reparere den. Selv når enheden er slukket, kan der stadig være farlige spændingsniveauer indeni. Derfor skal du altid sende enheden til dit Broncolor-værksted til vedligeholdelse og reparationer.
14. Miljøbeskyttelsesinformation
Ved slutningen af sin brugstid må dette produkt ikke bortskaffes som almindeligt husholdningsaffald. I stedet skal det afleveres til et indsamlingssted til genbrug af elektriske og elektroniske apparater. Materialerne kan genanvendes i henhold til deres mærkninger. Ved genbrug, genbrug eller andre former for brug af gamle apparater yder du et vigtigt bidrag til beskyttelsen af vores miljø.
Spørg venligst dine lokale myndigheder eller en Broncolor-salgspartner om det rette bortskaffelsessted.
15. Garanti
Alle Broncolor strømpakker, lamper, monolights og tilbehør er fremstillet efter høj kvalitetsstandard. Broncolor tilbyder to års fabriksgaranti fra købsdatoen (for den første ejer) på ovenstående Broncolor-produkter. Fra denne garanti er blitzrør, halogenlamper, sikkerhedsbriller, kabler, batterier og tekstiler. Fejl som følge af manglende overholdelse af sikkerhedsinstruktioner, forkert håndtering, brug af tilbehør fra en anden producent, uautoriseret indgriben eller modifikation er udelukket fra fabriksgarantien. Broncolor / PhotoRobot påtager sig intet ansvar for skader som følge af manglende overholdelse af sikkerhedsinstruktioner, forkert håndtering, brug af tilbehør fra en anden producent eller uautoriseret indgriben eller modifikation. I tilfælde af tekniske problemer bedes du straks kontakte den nærmeste autoriserede Broncolor servicestation. Artikelnumre, produktbeskrivelser og leveringsomfanget kan variere fra land til land. For mere detaljeret information, kontakt venligst din Broncolor-salgspartner. Fejl og trykfejl undtaget.
16. Meddelelse til britiske kunder
Denne enhed kan konfigureres til at forbinde til et trådløst LAN-netværk. Konfigurer venligst dette produkt til at forbinde til sikker infrastruktur. Brug ikke konfigurationstilstanden til normal drift.
- Rapporter om sikkerhedssårbarheder: support@broncolor.swiss
- Reaktionstid: 30 dage
- UK Defined Support Period: 2 år efter salgsdatoen, kun gældende for produkter solgt i Storbritannien (undtagen Nordirland) den 29. april 2024 eller senere
- Producentens navn: Bron Elektronik AG
- Producentens adresse: Hagmattstrasse 7, 4123 Allschwil, Schweiz
17. Tekniske data


EOS Rebel-serien


EOS DSLR-serien


EOS M-serien af spejlløse kameraer


PowerShot-serien


Close-Up / Håndholdt

Canon EOS Rebel-serien tilbyder begyndervenlige DSLR-kameraer med solid billedkvalitet, intuitive kontroller og alsidige funktioner. Disse kameraer er ideelle til fotoentusiaster og giver pålidelig autofokus, berøringsskærme, der kan vippes og drejes, og Full HD- eller 4K-videooptagelse.
Forbindelse
Opløsning (MP)
Opløsning
Canon EOS DSLR-serien leverer billeder i høj kvalitet, hurtig autofokus og alsidighed, hvilket gør den ideel til både fotografering og videoproduktion.
Forbindelse
Opløsning (MP)
Opløsning
Canon EOS M-serien af spejlløse kameraer kombinerer kompakt design med DSLR-lignende ydeevne. Med udskiftelige objektiver, hurtig autofokus og billedsensorer af høj kvalitet er disse kameraer gode til rejsende og indholdsskabere, der søger bærbarhed uden at gå på kompromis med billedkvaliteten.
Forbindelse
Opløsning (MP)
Opløsning
Canon PowerShot-serien tilbyder kompakte, brugervenlige kameraer til afslappede fotografer og entusiaster. Med modeller, der spænder fra simple peg-og-skyd til avancerede zoomkameraer, giver de bekvemmelighed, solid billedkvalitet og funktioner som billedstabilisering og 4K-video.
Forbindelse
Opløsning (MP)
Opløsning
Canons nærbilleder og håndholdte kameraer er designet til detaljeret fotografering og video tæt på. De er kompakte og nemme at bruge og tilbyder præcisionsfokus, billedbehandling i høj opløsning og alsidige makrofunktioner – perfekt til vlogging, produktfotografering og kreative nærbilleder.


